Tuesday, January 29, 2013
Valentine's Day Tissue Paper Heart
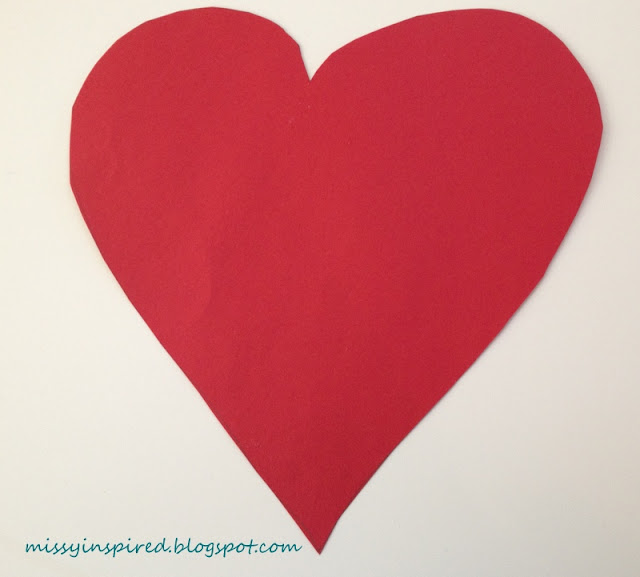
How cute is this heart? I was a huge fan of it when I saw the tissue heart garland on The Sunny Side Up blog. I decided to use this as my inspiration to make one large heart to go over my mantel. This is going to be the centerpiece of my Valentine's Day mantel, which I'll be unveiling in early February.
This project is simple and easy to do, but it is a little slow. The heart took me about 2 1/2 hours to complete, but I was able to do it while catching up on Once Upon a Time. Definitely have something good to watch on TV!
Materials and supplies
- Cardstock
- Pencil
- Elmer's glue
- Scissors
- Tissue paper
How to make this
1. Draw a heart on the cardstock in the size of your choice. I freehanded mine.
2. Cut out the heart.
3. Cut strips of tissue paper. I cut them about 1/2 inches wide.
4. Cut the strips into squares or rectangles. Try to keep them fairly uniform. The larger your squares, the more the tissue paper will stick out.
5. Lay out your heart, tissue paper, and glue. Get comfortable.
6. Take your first strip of tissue paper. Put your pencil eraser in the center of the tissue paper, and wrap the tissue paper around it.
7. Put a dab of glue on the tissue paper, rub off any excess. You need just enough so it will stick to the heart, but not so much that the tissue paper gets too wet or starts to stick to the eraser.
8. Outline the heart with the tissue paper.

9. Continue until you have finished outlining the heart, then start filling it in.
10. Fill in the entire heart. I then added a small loop of ribbon to the back to hang it.
The Shabby Creek
Delightful Order
Skip to My Lou
Confessions of an Overworked Mom
No Minimalist Here
Happy Go Lucky Blog
Seven Alive Blog
Food Done Light
Lovely Army Wife Blog Hop
Somewhat Simple
Live Laugh Rowe
Glued to my Crafts
Momnivores Dilemma
Smart School House
A Glimpse Inside
Ginger Snap Crafts
The Trendy Treehouse
Someday Crafts
Creations by Kara
Consider Me Inspired
Inspire Me Monday
Sew Can Do
Skip to My Lou
Uncommon Designs
Sarah Dawn Designs
Keeping it Simple
Pint Sized Baker
I Should be Mopping the Floor
Romance on a Dime
Crafty Confessions
The DIY Dreamer
The Blackberry Vine
Elizabeth and Co.
Ginger Snap Crafts
The Melrose Family
DIY Craft Projects
DIY by Design
PJH Designs
Kathe With an E
The Trendy Treehouse
Southern Lovely
Sew Much Ado
Create Craft Love
Delightful Order
The Shabby Creek Cottage
Katherines Corner
Craftionary
Twinkle in the Eye Blog
Simply Designing
Joyful Stamper
Raising Memories
I Heart Naptime
The Foley Fam
C.R.A.F.T.
Create With Joy
Sew Can Do
DIY Show Off
Friday, January 25, 2013
Friday I'm in Love: 11 Accessories YOU can make today
For this week's Friday inspiration post, I scoured the Internet for the BEST accessory tutorials. And boy, did I find some great projects! Several of them have been on my to-do list for a while now and I'm excited to finally try them!
Check out all of these projects and visit these talented bloggers!
1. Painted Bobby Pin Tutorial from Love Design Sunshine
This tutorial is so simple, yet brilliant. I have a ton of bobby pins around my house and I love the idea of creating cheap, fast accessories by painting them with nail polish.
2. Chunky Black Statement Necklace from My Girlish Whims
I have a soft spot for jewelry making, although I don't get to do it nearly as often as I'd like. Some tools are needed to create this necklace, but the actual skills needed don't look too bad. This tutorial seems reasonably easy for any crafter with basic-to-intermediate skills.
3. Book Page Necklace from Mandipidy
I LOVE this necklace. The idea of turning my favorite books into a necklace really intrigues me. I like the idea of using a line or section from one of my favorite books, so I can have it with me everywhere I go.
4. Hair Comb Tutorial from Lemon Jitters
This is another super-simple looking tutorial that has nice results. I like how fast this project looks to do and the many options for customization, given how many different colors of embroidery floss are available.
5. Rosette Bracelet Tutorial from Sew.Craft.Create.
This bracelet is gorgeous. The end result looks complicated to me, but the tutorial is great and makes it seem so simple. I need to get one of these into my bracelet collection PRONTO!
6. Ric Rac Rose Ring from The Ribbon Retreat
How cute is this ring? I think it's adorable and I love the detailed tutorial from The Ribbon Retreat. I like the idea of making a few of these, in different colors.
7. Ways to Repurpose Clip-On Earrings from Ruffles And Stuff
I like the idea of clip-on earrings being used in somewhat trendy projects. The ideas on this site are great and she gives 10 different ways to use clip-on earrings. This makes me want to run to the mall to stock up on clip ons!
8. Simple and Sweet Pendants from Simply Creating Home
These pendants truly are sweet, just like their name. I like any craft that works in scrapbook paper. Buying the scrapbook paper is my favorite part of any paper project. To be able to use some pretty paper to make jewelry sounds pretty great to me!
9. T-shirt Flowers from Green Your Way
Who doesn't have plenty of old t-shirts laying around the house? This project makes use of all those old tees--by making something pretty. As a bonus, this site also came up with several other ways to repurpose an old t-shirt.
10. Braided Bracelet from Sweet November
I like the delicate look of this bracelet from the pearls beaded in. This is a 5-minute project and the results are beautiful!
11. Paperclip Earrings from Evie S.
These earrings meet my criteria for a great DIY accessory--simple, lots of customization options, and super cute! This project seems like a clear win!
Thanks so much to all of the bloggers who let me feature them in this post! Check out more of my favorite accessory tutorials on Pinterest.
Also, I'd appreciate it if you took a second to follow this blog! The link is in the left navigation. Just click "Join this Site." Thanks!

Check out all of these projects and visit these talented bloggers!
1. Painted Bobby Pin Tutorial from Love Design Sunshine
This tutorial is so simple, yet brilliant. I have a ton of bobby pins around my house and I love the idea of creating cheap, fast accessories by painting them with nail polish.
 |
| Love. Design + Sunshine. |
2. Chunky Black Statement Necklace from My Girlish Whims
I have a soft spot for jewelry making, although I don't get to do it nearly as often as I'd like. Some tools are needed to create this necklace, but the actual skills needed don't look too bad. This tutorial seems reasonably easy for any crafter with basic-to-intermediate skills.
 |
| My Girlish Whims |
I LOVE this necklace. The idea of turning my favorite books into a necklace really intrigues me. I like the idea of using a line or section from one of my favorite books, so I can have it with me everywhere I go.
 |
| Mandipidy |
4. Hair Comb Tutorial from Lemon Jitters
This is another super-simple looking tutorial that has nice results. I like how fast this project looks to do and the many options for customization, given how many different colors of embroidery floss are available.
 |
| Lemon Jitters |
5. Rosette Bracelet Tutorial from Sew.Craft.Create.
This bracelet is gorgeous. The end result looks complicated to me, but the tutorial is great and makes it seem so simple. I need to get one of these into my bracelet collection PRONTO!
 |
| Sew.Craft.Create. |
6. Ric Rac Rose Ring from The Ribbon Retreat
How cute is this ring? I think it's adorable and I love the detailed tutorial from The Ribbon Retreat. I like the idea of making a few of these, in different colors.
 |
| The Ribbon Retreat |
I like the idea of clip-on earrings being used in somewhat trendy projects. The ideas on this site are great and she gives 10 different ways to use clip-on earrings. This makes me want to run to the mall to stock up on clip ons!
 |
| Ruffles And Stuff |
8. Simple and Sweet Pendants from Simply Creating Home
These pendants truly are sweet, just like their name. I like any craft that works in scrapbook paper. Buying the scrapbook paper is my favorite part of any paper project. To be able to use some pretty paper to make jewelry sounds pretty great to me!
 |
| Simply Creating Home |
9. T-shirt Flowers from Green Your Way
Who doesn't have plenty of old t-shirts laying around the house? This project makes use of all those old tees--by making something pretty. As a bonus, this site also came up with several other ways to repurpose an old t-shirt.
 |
| Green Your Way |
I like the delicate look of this bracelet from the pearls beaded in. This is a 5-minute project and the results are beautiful!
 |
| Sweet November |
These earrings meet my criteria for a great DIY accessory--simple, lots of customization options, and super cute! This project seems like a clear win!
 |
| Evie S |
Thanks so much to all of the bloggers who let me feature them in this post! Check out more of my favorite accessory tutorials on Pinterest.
Also, I'd appreciate it if you took a second to follow this blog! The link is in the left navigation. Just click "Join this Site." Thanks!

Labels:Accessories,Crafts,Friday I'm in Love | 18
comments
Monday, January 21, 2013
Valentine's Day Heart Art
I've been excited to try this project since I ran across it over on Sew Fantastic. She did a great job with this art project, using an art canvas. I decided to try my hand at it, and tweaked it so it could be framed. I'm happy with the end result and it looks great on my upcoming Valentine's Day mantel.
Materials and supplies
- 8 X 10 frame
- 8 X 10 white paper
- Various scrapbook papers in shades of pink and red
- Heart hole punch
- Foam adhesive
- Pencil
- Ruler
How to make this
1. Start with paper or canvas, in a size of your choice. I went with an 8x10 paper to fit within a standard frame.
2. Use the hole punch to cut out your hearts. I went with six different shades of pink and red, laid out from light to dark.
3. Line up the hearts. I measured mine with a ruler and pencil because I'm not great at eyeballing these things. Horizontally, I put a heart at 1, 3, 5, and 7 inches. Vertically, I went with 4, 8, 12, 16, 20 and 24 cm. I placed the bottom of the heart on each of these measurements.
4. Put the foam adhesive on each heart. I started out going across, then down, making sure to keep everything lined up.
5. Put the finished picture in a frame, if desired. I had to remove the glass from my frame, since the foam adhesive gave it some depth.
Link parties
Food One Light
Somewhat Simple
Live Laugh Rowe
Glued to my Crafts
Momnivores Dilemma
A Glimpse Inside
The Trendy Treehouse
Someday Crafts
Consider Me Inspired


 T
T





Subscribe to:
Comments
(Atom)
Powered by Blogger.
Followers
Blog Archive
-
▼
2013
(33)
-
▼
January
(11)
- Valentine's Day Tissue Paper Heart
- Friday I'm in Love: 11 Accessories YOU can make today
- Valentine's Day Heart Art
- Friday I'm in Love: The Best Valentine's Day Craft...
- How to make a Pier 1 Inspired Wishing Tree
- Matchbox car garage
- Friday I'm in Love: Favorite Pins of the Week
- A Mantel a Month: January Mantel
- Hot chocolate bar
- Strawberry Santa Dessert Tutorial
- Top 5 Resolutions for Every Mom
-
▼
January
(11)


