
Wednesday, February 27, 2013
Lucky Me Burlap and Clover Picture

I whipped up this cute four leaf clover picture in about 20 minutes. Here's how I did it!
Materials and Supplies
- 5 x 7 Picture frame- Heart hole punch
- Green cardstock
- Beige cardstock
- Burlap fabric
- Jewelry wire (24 gauge)
- Wire cutter
- Foam adhesive
- Hot glue gun
- Scissors (not shown)
- Pencil (not shown)
- Tape (not shown)

How to Make This
1. Cut your mat.
My picture frame didn't have a mat, so I used a piece of beige cardstock and cut it to size. One tip is to cut your mat a little small. The burlap added a bit of bulk to the mat and it was a little hard to put in the frame at the end.

2. Cut the burlap fabric about 1/4 to 1/2 inch larger than your mat.

3. Iron the burlap.
Mine was pretty wrinkled and I wanted it to be smooth.4. Tape down the burlap to the back of the mat.
I decided to use tape to hold the burlap in place. You could also use glue.
5. Cut out your hearts using a heart hole punch, or cut them freehand.

6. Add your wire to the picture to make a stem.
At the top of the stem, I wove the wire into the burlap. I wrapped the wire under the bottom of the picture and taped it on the other side.
7. Add the hearts to make the clover.
I went with a four-leaf clover. A three-leaf one would also work. I used foam adhesive on each of the hearts to give the picture more depth. I also put a dab of hot glue in the center, so each of the points of the heart are held in place by it.
8. Make leaves using more wire.
I tried a few methods to make these leaves. I had the best luck with slipping the wire under the stem and weaving it into the burlap. Then I wrapped the wire around itself and made a loop on each side. I tucked the ends of each loop under the burlap to hold it in place.
9. Slip your picture into a frame and enjoy!

Link Parties
Click here to see the link parties I visit each week.
Thursday, February 21, 2013
Easter Ribbon Wreath
Today I'm excited to share a guest post from my friend Sarah from Sarah Matthews Photography. I've known Sarah for nearly four years now, since we were both pregnant with our sons. Sarah posted this ribbon wreath on Facebook and I immediately fell in love with it. Luckily, she was interested in sharing a tutorial with us. Enjoy her tutorial and stop by Sarah's blog to say hi!
Without further ado, I give you Sarah's ribbon wreath:


Without further ado, I give you Sarah's ribbon wreath:
Sarah's Ribbon Wreath
Hi! I'm Sarah: wife, mom of two small children (20 months and 3.5 years), amateur photographer, and full time NICU nurse who loves to craft and organize. My goal is to decorate my home with projects I created, and photographs I have taken. In my "spare time," I like to do simple projects that can be completed in an evening or naptime - because let's face it, I don't have much spare time! I recently created a ribbon wreath for my Easter/Spring mantel, and had a huge response when I posted on Facebook and Instagram. Missy asked me to share with you how I did it!
Materials and Supplies
- Various sizes and colors of ribbon
- Styrofoam wreath
- Straight pins (I purchased a box of 500 and have used them for 2 projects, with plenty left for at least 1-2 more wreaths!)
- Scissors

For
this project, I used 9 different spools of ribbon, ranging from 5/8
inch to 1.5 inches. I don't recommend using anything smaller or larger
than those sizes. You can choose your ribbon texture. I personally
like grosgrain ribbon, although you might notice some satin ribbon. I
did a similar wreath at Christmas, and learned that sheer, wired, and
glittery ribbons are much harder to work with. I did not finish any
spool or ribbon, although a couple spools have one foot or less left (8
of the 9 were brand new and purchased specifically for this project).
My styrofoam wreath was actually purchased last fall
in the dollar spot at Target. It is smaller (9.5inch diameter) than
most you will find in craft stores. It is a pretty hideous
yellow/orange color, but I bought a few of these last year anyway
because I knew I could use them in projects that would cover that color.
You can use any styrofoam wreath you find, but most tend to be bigger
than this - just keep that in mind when purchasing ribbon!
Cut the ribbon into about 4 inch lengths. I
found the easiest way for me was to cut 12-15 lengths of each ribbon and
organize by pattern. I did not use a ruler, and it doesn't matter if
they are different lengths, this is just an average. Fold one piece of
ribbon into a circle, and where the ends meet, use a pin to secure the
loop to the wreath.

Repeat all
over the wreath, randomly placing the different patterns. I just
randomly placed ribbons, and the only "rule" I followed was trying to
avoid placing 2 loops of the same ribbon directly next to each other.

Keep going,
until the entire wreath is covered in ribbon. Don't forget the top and
inside, and check from different angles to see if you have any big gaps
of styrofoam! I found that using wider ribbons on the top/outside was
easier for me.
If you are placing the completed wreath on a wreath
hanger, your wreath is finished! If you plan to hang it differently
(mine hangs from a mirror on our mantel), there is one more step to
take. Cut a length of ribbon long enough to hang the wreath from your
mirror/cabinet/door, so that the ribbon extends to the other side of the
mirror. Straight pin the ribbon (I used my widest ribbon) to the back
of the wreath, and since this is a lightweight wreath, you can simply
tape the ribbon to the other side of wherever it will hang.

That's it!
This took about an hour from start to finish, and I love the pop of
color it gives my mantel (since I have not yet put up any other Easter
decorations!

Thanks so much to Sarah for sharing this tutorial on Missy Inspired! Stop by her blog to say hi and check out more of her work!
Joyful Stamper
DIY Show Off
A Little Knick Knack
Raising Memories
I Heart Naptime
C.R.A.F.T.S
Create with Joy
Sew Can Do
Skip to My Lou
Sarah Dawn Designs
Keeping it Simple Crafts
Making the World Cuter
PJH Designs
By Stephanie Lynn
Homemaker on a Dime
Romance on a Dime
The DIY Dreamer
The Blackberry Vine
Elizabeth & Co.
Ginger Snap Crafts
The NY Melrose Family
DIY Crafty Projects
DIY By Design
TwelveOEight
The Shabby Creek Cottage
Creations by Kara
The Trendy Treehouse
I Gotta Create
Southern Lovely
Sew Much Ado
No Minimalist Here
Happy Go Lucky Blog
Seven Alive
Live.Laugh.Rowe
View from River Mountain
Fluster Buster
Create.Craft.Love.
Delightful Order
Katherines Corner
Craftionary
Twinkle in the Eye
Creative Crafts Thursday
A to Z Celebrations
Daisy Cottage Designs
The Taylor House
DIY Show OffHomemaker on a Dime
Raising Memories
I Heart Naptime
The Foley Fam
C.R.A.F.T.
I Should be Mopping the Floor
Link Parties
Simply DesigningJoyful Stamper
DIY Show Off
A Little Knick Knack
Raising Memories
I Heart Naptime
C.R.A.F.T.S
Create with Joy
Sew Can Do
Skip to My Lou
Sarah Dawn Designs
Keeping it Simple Crafts
Making the World Cuter
PJH Designs
By Stephanie Lynn
Homemaker on a Dime
Romance on a Dime
The DIY Dreamer
The Blackberry Vine
Elizabeth & Co.
Ginger Snap Crafts
The NY Melrose Family
DIY Crafty Projects
DIY By Design
TwelveOEight
The Shabby Creek Cottage
Creations by Kara
The Trendy Treehouse
I Gotta Create
Southern Lovely
Sew Much Ado
No Minimalist Here
Happy Go Lucky Blog
Seven Alive
Live.Laugh.Rowe
View from River Mountain
Fluster Buster
Create.Craft.Love.
Delightful Order
Katherines Corner
Craftionary
Twinkle in the Eye
Creative Crafts Thursday
A to Z Celebrations
Daisy Cottage Designs
The Taylor House
DIY Show OffHomemaker on a Dime
Raising Memories
I Heart Naptime
The Foley Fam
C.R.A.F.T.
I Should be Mopping the Floor
Wednesday, February 20, 2013
St. Patrick's Day Glitter Vase
Valentine's Day is over, so it's time for St. Patrick's Day crafts! For my first craft of this season, I took on a sparkly vase. I saw a sparkly Valentine's Day vase like this on A Glimpse Inside and I thought it would look great in alternating shades of green.

- Glitter (two colors)
- Double sided tape (I used 1 1/4 rolls)
- Disposable bowl (not shown)
- Tissue (not shown)
- Sealant (optional)


Tip: Try to line up the start and end pieces of your tape so they are in a row. In some cases, I got a little extra glitter at the start/end of my tape, so it was helpful to have them line up together in the back of my vase.


Create Craft Love
Delightful Order
Craftionary
Blissful and Domestic
Twinkle in the Eye
Creative Kreationz
Simply Designing
Joyful Stamper
DIY Show Off
A Little Knick Knack
Raising Memories
I Heart Naptime
C.R.A.F.T.S
Create with Joy
Sew Can Do
Skip to My Lou
Sarah Dawn Designs
Keeping it Simple Crafts
Making the World Cuter
PJH Designs
By Stephanie Lynn
Homemaker on a Dime
Romance on a Dime
The DIY Dreamer
The Blackberry Vine
Elizabeth & Co.
Ginger Snap Crafts
The NY Melrose Family
DIY Crafty Projects
DIY By Design
TwelveOEight
The Shabby Creek Cottage
Creations by Kara
The Trendy Treehouse
I Gotta Create
Southern Lovely
Sew Much Ado
No Minimalist Here
Happy Go Lucky Blog
Seven Alive
Live.Laugh.Rowe
View from River Mountain
Fluster Buster
Create.Craft.Love.
Delightful Order
Katherines Corner
Craftionary
Twinkle in the Eye
Creative Crafts Thursday
Daisy Cottage Designs
A to Z Celebrations
The Taylor House

Materials and Supplies
- Vase- Glitter (two colors)
- Double sided tape (I used 1 1/4 rolls)
- Disposable bowl (not shown)
- Tissue (not shown)
- Sealant (optional)

How to Make This
1. Put your first layer of tape around the vase.
Determine how thick you want each stripe. I alternated between single strips of tape and double strips of tape, for larger stripes.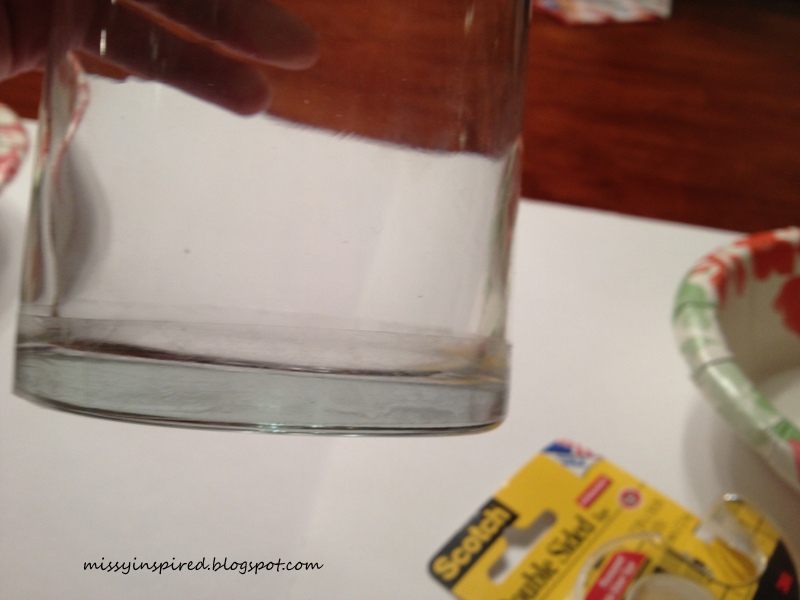
2. Pour glitter onto the tape.
Tap the glitter onto the strip of tape.
3. Tap off excess glitter.
Do this over a disposable bowl or paper. You can pour this back into the glitter container when you're done.4. Use a tissue to wipe off excess glitter.
Keep a sharp edge above or below the tape line.
5. Continue to alternate stripes of glitter.
Do one color at a time, to keep clean lines. You can make larger or smaller stripes depending on how many rows of tape you place at once.Tip: Try to line up the start and end pieces of your tape so they are in a row. In some cases, I got a little extra glitter at the start/end of my tape, so it was helpful to have them line up together in the back of my vase.

6. Consider using a spray sealant to seal your vase.
I'm waiting for a nice day to do this outside, but I think it will be helpful to keep the glitter on the vase. Small amounts come off, unless you handle it carefully.
Link Parties
Katherines CornerCreate Craft Love
Delightful Order
Craftionary
Blissful and Domestic
Twinkle in the Eye
Creative Kreationz
Simply Designing
Joyful Stamper
DIY Show Off
A Little Knick Knack
Raising Memories
I Heart Naptime
C.R.A.F.T.S
Create with Joy
Sew Can Do
Skip to My Lou
Sarah Dawn Designs
Keeping it Simple Crafts
Making the World Cuter
PJH Designs
By Stephanie Lynn
Homemaker on a Dime
Romance on a Dime
The DIY Dreamer
The Blackberry Vine
Elizabeth & Co.
Ginger Snap Crafts
The NY Melrose Family
DIY Crafty Projects
DIY By Design
TwelveOEight
The Shabby Creek Cottage
Creations by Kara
The Trendy Treehouse
I Gotta Create
Southern Lovely
Sew Much Ado
No Minimalist Here
Happy Go Lucky Blog
Seven Alive
Live.Laugh.Rowe
View from River Mountain
Fluster Buster
Create.Craft.Love.
Delightful Order
Katherines Corner
Craftionary
Twinkle in the Eye
Creative Crafts Thursday
Daisy Cottage Designs
A to Z Celebrations
The Taylor House
Thursday, February 14, 2013
Send a Valentine's Day Hug
The little man and I had a lot of fun putting together his Valentine's Day cards for the grandparents and great grandparents. I saw this idea on Fun Family Crafts last year and thought the grandparents would go nuts over it! (And I was right!)

- Paint
- Paint brushes
- Ribbon
- Letter stickers
- Hot glue gun or adhesive
- Scissors


The Trendy Treehouse
DIY Craft Projects
I Gotta Create
Southern Lovely
Create.Craft.Love.
The Shabby Creek Cottage
Katherine's Corner
Craftionary
Blissful and Domestic
Twinkle in the Eye
Joyful Stamper
A Little Knick Knack
Homemaker on a Dime
Raising Memories
I Heart Naptime
The Foley Fam
C.R.A.F.T.
Create With Joy
Sew Can Do
Keeping it Simple Crafts

Materials and supplies
- Cardstock- Paint
- Paint brushes
- Ribbon
- Letter stickers
- Hot glue gun or adhesive
- Scissors

How to make this
1. Paint the outside of the card.
We had a lot of fun doing this! I set up some masks (using heart punches and other cut outs of hearts), so the little guy could paint and I could remove the masks after he was done and have some blank shapes.


2. Find some little hands to paint!
I used a foam roller to cover his hands in paint, then pressed his hands onto the papers. I repainted between each hand print.3. After the paint dries, cut around the hand prints.
4. Take the ribbon and measure the length of a hug.
I had him spread open his arms, then measured from wrist to wrist.5. Glue the ribbon to the back of each hand.
6. Use the letter stickers to write your chosen message.

Link parties
Delightful OrderThe Trendy Treehouse
DIY Craft Projects
I Gotta Create
Southern Lovely
Create.Craft.Love.
The Shabby Creek Cottage
Katherine's Corner
Craftionary
Blissful and Domestic
Twinkle in the Eye
Joyful Stamper
A Little Knick Knack
Homemaker on a Dime
Raising Memories
I Heart Naptime
The Foley Fam
C.R.A.F.T.
Create With Joy
Sew Can Do
Keeping it Simple Crafts
Friday, February 8, 2013
Strawberry Shortcake Kabobs

One of my go-to party desserts are strawberry shortcake kabobs. I ran across them a year or two ago on Pinterest, from The Inspired Collection. They are easy to make, yummy, and they involve sticks! Everything tastes better when you eat it off a stick, no?
Ingredients and Supplies:
- Strawberries- Lemon pound cake
- White chocolate chips
- Wooden skewers
- Knife
- Cutting board
- Glass bowl
- Spatula

How to Make These:
1. Cut the pound cake into cubes.
Try to keep them fairly uniform.
2. Cut the tops off the strawberries.

3. Skewer the fruit and cake.
I like to alternate, starting and ending with the cake. You can make longer skewers or smaller ones. I like the smaller ones for parties because they are a little less of a commitment--especially when there are all sorts of yummy things to sample!

4. Put all the kabobs on large plates together, to get ready for spreading the chocolate.

5. Melt the white chocolate.
We did it in the microwave, starting with small spurts of time (about 30 seconds), stirring between each time. It took us about three times in the microwave before the chips were melted.Note: Be careful not to over microwave the white chocolate, or you'll end up with a thick blob that is hard to spread. We waited until the chocolate was just starting to melt--it still looked like chips in the bowl, but melted as you stirred it.

6. Spoon the chocolate over the kabobs.
I think this works best when you are neat and orderly, but you can also do it more free form (like the one in the top left). It tastes good either way. :)
7. Enjoy!

I've brought these to birthday parties, July 4 parties, and holiday parties. I think they would also be great for a Valentine's Day party. What is your go-to dessert for parties?
Link parties
Keeping it Simple Crafts
The Blackberry Vine
Sassy Little Lady
Romance on a Dime
The DIY Dreamer
Elizabeth & Co.
Ginger Snap Crafts
The NY Melrose Family
DIY By Design
Delightful Order
The Trendy Treehouse
DIY Craft Projects
I Gotta Create
Southern Lovely
Create.Craft.Love.
The Shabby Creek Cottage
Katherine's Corner
Craftionary
Raising Memories
I Heart Naptime
Blissful and Domestic
Twinkle in the Eye
Joyful Stamper
A Little Knick Knack
Homemaker on a Dime
The Foley Fam
C.R.A.F.T.
Create With Joy
Sew Can Do
Keeping it Simple Crafts
Tuesday, February 5, 2013
Conversation Heart Inspired Valentine Sign
My Pinterest wall has practically exploded with Valentine's Day decorations. One thing I've been kicking around is some conversation-heart inspired decorations. The Convo Hearts from The Peanut Paintshop was my main inspiration.
I've also been eyeing these projects:
Valentine Heart Candle from Crafty Journal
Candy Heart Topiary from Tiny Prints Blog
Conversation Heart Picture
Today's project is the quickest and easiest project I've done yet! I chose to make this using foam hearts I found at Michaels, but you could do this with heart-shaped papers or painted wooden hearts.

Materials and supplies
- Foam hearts
- Ribbon
- Letter stickers
- Hot glue gun or tape
- Scissors

How to make this
1. Add letters to make the name, word, or phrase you want for your heart.

2. Complete the remaining hearts with the name, phrase, or words.

3. Add the ribbon to the backs of the hearts. I cut one long length of ribbon and attached it to the backs of the hearts with a hot glue gun.

4. Create a bow or loop at the top of the ribbon to hang the project.

5. Hang and enjoy.

Link parties
A Little Knick Knack
Homemaker on a Dime
Raising Memories
I Heart Naptime
The Foley Fam
C.R.A.F.T.
Create With Joy
Sew Can Do
Keeping it Simple Crafts
The Blackberry Vine
Sassy Little Lady
PJH Design
Romance on a Dime
The DIY Dreamer
Elizabeth & Co.
Ginger Snap Crafts
The NY Melrose Family
DIY By Design
Delightful Order
The Trendy Treehouse
DIY Craft Projects
I Gotta Create
Southern Lovely
Create.Craft.Love.
The Shabby Creek Cottage
Katherine's Corner
Craftionary
Blissful and Domestic
Twinkle in the Eye
Joyful Stamper
Saturday, February 2, 2013
A Mantel a Month: February Valentine's Day Mantel
I'm continuing my "Mantel a Month" series with a February Valentine's Day mantel. This was a lot of fun to put together and it brings some nice pops of color into my otherwise neutral living room.
If you've been reading my blog this month, you've probably seen some of these projects (Valentine's Day Heart Art and Valentine's Day Tissue Paper Heart). I'm happy with how it all came together on my mantel.

What's on my mantel in February
Above the mantel: Valentine's Day Tissue Paper Heart. Click here for the tutorial.

Far left: Candle and candleholder, heart picture painted by my little guy, and red vase from last Valentine's Day.

Center: The little guy's first Valentine's Day picture and three small red vases that I painted using this technique.

Far right: Valentine's Day Heart art (click here for the tutorial). Candle and candleholder.

Each end of the mantel: Red heart Christmas ornaments.

Below the mantel: I used two rows of garland. The larger, open hearts are from Michaels. The smaller, red hearts are from the Dollar Tree.

What do you think about how it all came together? Feel free to link up any of your Valentine's Day mantels in the comments sections. I'd love to check out your mantels!
Please also click the "Join this site" button in the left-hand panel to make sure you don't miss any of my other mantel projects.

Link parties:
Make the Scene Monday
Homemaker on a Dime
Sunday Funday at Foley Fam
I Heart Nap Time
Flamingo Toes
Cupcakes and Crinoline
Petite Hermine
Inspire Me Monday
Project Inspire
Lamb Around
Life on Lakeshore Drive
Or So She Says
Pint Sized Baker
I Should be Mopping the Floor
Romance on a Dime
Crafty Confessions
The DIY Dreamer
The Blackberry Vine
Elizabeth and Co.
Ginger Snap Crafts
The Melrose Family
DIY Craft Projects
DIY by Design
PJH Designs
Kathe With an E
The Trendy Treehouse
Southern Lovely
Sew Much Ado
Create Craft Love
Delightful Order
The Shabby Creek Cottage
Katherines Corner
Craftionary
Twinkle in the Eye Blog
Simply Designing
Joyful Stamper
A Little Knick Knack
Raising Memories
The Foley Fam
C.R.A.F.T.
Create With Joy
Sew Can Do
The Blackberry Vine
Sassy Little Lady
DIY Show Off
PJH Design
Subscribe to:
Posts
(Atom)


Subscribe To


Grab A Button

