
Thursday, March 7, 2013
St. Patrick's Day Wreath

I put together this pretty wreath to go over my St. Patrick's Day Mantel. I planned to keep this wreath super simple, on the idea of this wreath from Pinch a Little Save a Lot. However, I decided to switch it up a bit because I really liked the green satin ribbon I bought to cover the wreath and I wanted to keep it somewhat visible. I also used this opportunity to FINALLY learn how to make felt flowers. I can't believe this was my first time making flowers--now I'm hooked and plan to do a lot more for various spring projects.
This wreath took me about 2 1/2 hours to make, but that was mostly learning how to make the flowers. The wreath itself went pretty fast. Here's how I did it!
Materials and Supplies
- Wreath form
- Hot glue gun
- Green ribbon
- Foam clovers
- Felt - white and several shades of green

How to Make This
1. Cover the wreath in ribbon.
I wrapped the ribbon around the wreath, with a slight overlap each time. I actually ran out of ribbon toward the end, but I was able to cover the gaps with the clovers and flowers.

2. Make felt flowers.
There are a lot of good flower tutorials online. I used tutorials from My Design Dump and Cherry Street Cottage - this one also has a great video tutorial.
3. Trace a circle.
I used three different size circles. I traced two plastic bowls and one glass rim to get my circles.
4. Cut out your circle.

5. Cut a spiral into your circle.
Start from the outside and work your way in.
6. Start twisting your circle.
Start in the middle and roll your circle. Add some hot glue or fabric glue every couple of rolls.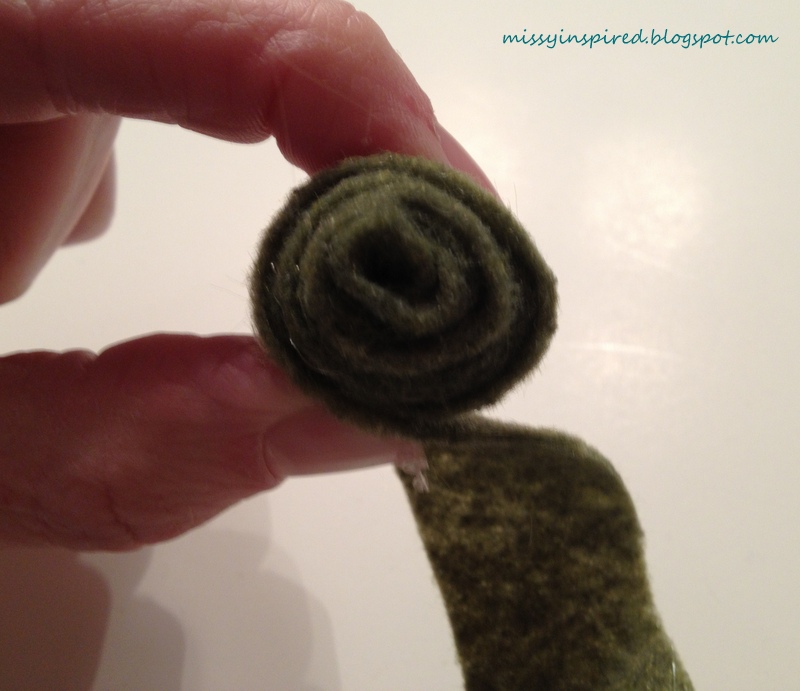
7. Twist the fabric to add some interest.
After about 2/3-3/4 of the way, I started twisting the fabric. I thought it added a lot more interest to the flower than a straight-up rosette. There is a great tutorial on Cherry Street Cottage to show how to do this.


8. Glue a ribbon to the top of the wreath.
I also added a ribbon to the side of my wreath to keep it hanging right, given that the weight is a little lopsided.
9. Lay out the clover on the wreath.
I picked up several packs of these foam clovers at the Dollar Tree. I decided to put my clovers on about 1/2 to 2/3 of the wreath, to keep the pretty green ribbon visible.
10. Glue the clovers to the wreath.
I used hot glue to do this and overlapped the clovers a bit.
11. Hot glue the rosettes to the wreath.


12. Hang the wreath and enjoy.

Link Parties
Click here to see the link parties I visit each week.
Subscribe to:
Post Comments
(Atom)


Subscribe To


Grab A Button


The wreath is gorgeous! Love it!
ReplyDeleteThe wreath is beautiful.
ReplyDeleteVery cute! Great use of the foam shamrocks!
ReplyDeleteI LOVE this!! It turned out so cute!! Thanks for sharing! :)
ReplyDeleteWow. I love this wreath. I don't decorate for holidays, but I really like this. I would love it if you would share this over at my link party.
ReplyDeletehttp://ifitsnotbaroquedesignblog.blogspot.com/2013/03/tuesday-link-party-10.html
I love your wreath!
ReplyDeleteI wish I would have seen this tutorial before I made my St. Patty's Day wreath! I wanted to make some flowers and didn't know how!
ReplyDeleteI would love it if you would share this and any other crafts on the In and Out of the Kitchen Link Party. It is live now and will run through Wednesday. I hope to see you there!
Cynthia at http://FeedingBig.com
http://www.feedingbig.com/2013/03/in-and-out-of-kitchen-8.html
Gorgeous!! you are so crafty! I love your blog. I hope you stop by to link every week- http://atozebracelebrations.com/2013/03/link-party-every-tuesday.html
ReplyDeleteNancy
Your wreath is AWESOME! I loved how you used all sorts of shades of green. It looks so simple...which I loved. Definitely pinned!
ReplyDeleteKatie @ www.thoughtfulology.blogspot.com
Your wreath is so cute! St. Paddys Day is a fun one to celebrate :)
ReplyDeleteThanks so much for linking up at the Wildly Original party over at I Gotta Create!
<3 Christina
Just finished pinning this and have to say it is so gorgeous!! Thanks for sharing.
ReplyDeleteJamie
www.huckleberrylove.com
Wonderful wreath! Perfect for the month of March! Thanks for sharing it at Monday Funday!
ReplyDeleteSuch a wonderful wreath!Love it!Thanks so much for sharing the great tutorial!
ReplyDeleteHave a fabulous week!
Hugs from Portugal,
Ana Love Craft
www.lovecraft2012.blogspot.com
Such a cute wreath!! Love the layering. Thanks for linking up at Romance on a dime!!
ReplyDeleteBeautiful wreath! Thanks for linking up at Transformed Tuesday this week.
ReplyDeleteHugs,
Peggy~PJH Designs
very pretty. Thank you for sharing your lovely blog at the Thursday Favorite Things blog hop xo
ReplyDeleteLove the texture and the shades of green!
ReplyDeleteThis is such a pretty wreath. Thank you for linking up at Fluster's Creative Muster. Hope to see you next week!
ReplyDeleteRobin @ Fluster Buster
This is fantastic! What an amazing talent you have! I can't wait to try out your ideas with my kids. Thanks for sharing. New follower from Night Owl Venting's blog hop! You can follow me back or just check out my page at www.delectablydawn.com or on facebook at www.facebook.com/delectablydawn
ReplyDelete